|
Another feature of Escher's devices in his prints is that of what I term as development. As such, the term development is defined here in the sense that from an initial start with an arbitrary tessellating polygon, typically squares, equilateral triangles or hexagons, the lines of this take on a more and more life-like motif, with upon ‘completion' the tessellation is thus shown as a fully developed motif. This can be shown either as a distinct entity in its own right, for example with elements of Metamorphosis I, with squares developing into lizards, or in conjunction with grey to stark black and white effects, for example Development I.
Escher's Methodology
Regrettably, Escher did not show or discuss per se how such effects were accomplished, with his methodology relating to this work still to be published. Furthermore, not even a single diagram has been shown (for possible reasons as to why see Introduction to the essays). Consequently, as his successors have not been able to access the theory underlying this, uncertainty as to methodology abounds. As a considered study is thus overdue, I will thus show how he probably undertook such matters using my own method, gained from my analysis of the appropriate works. Again, as with the 'black, white and grey' aspects, I must emphasise 'probably', as without evidence of his method I cannot be absolutely certain. However, as the following is infallible, he must have used a similar process, if indeed not identical, so that, even if this is slightly different, it would be at most a minor variation of his methodology. |
| |
|
My Own Methodology
Firstly, pleasingly, although the actual process is most simple, with any mathematics underlying at a minimum, it is not the easiest thing to explain into words, as variations and relative complexities emerge. Consequently, for demonstrative purposes, I use an example of a simplest nature, a geometrical outline using a Greek cross motif, purely for reasons of convenience, as its outlines are ideal. When the basic method is understood, it can thus be applied to other tessellations that are more 'complex' (in terms of their angularity of outline).
Consequently, it would be well to recreate the example given here, using squared paper, thereby aiding understanding, from which one can then suitably progress with developments of ones own devising.
A development can be said to have four distinct stages, although once the method is assimilated it will be possible to essentially immediately proceed to the final stage upon 'working out' the development processes beforehand. Each stage is shown below.
|
| Step 1 - Analysing the Tile
Firstly, the tile itself must be analysed to determine how its lines are arranged i.e. its symmetry system. In this particular example, the Greek cross will be found to be based upon a square. The tile itself consists of a single line, with 180° rotational symmetry about its mid-point, with the line rotated 90° at the vertices. Having thus determined this matter, all these properties must be retained in the development process.
|
|
|
| Step 2 - Individual Deforms 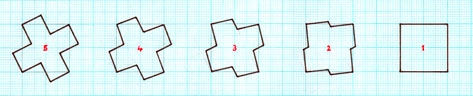
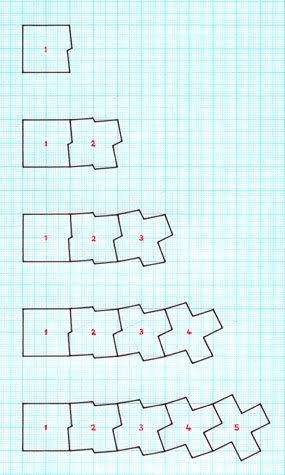
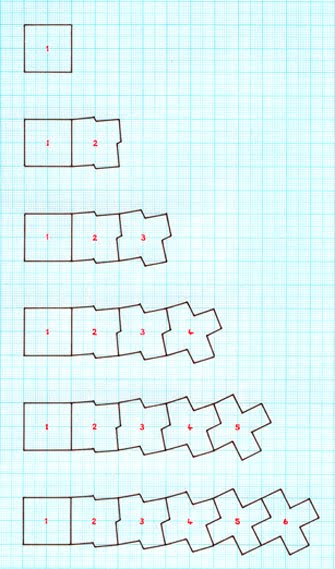
So having thus examined the underlying structure, the next step is to begin the development process. Although the impression given in the final stage with these is indeed of a development, in this instance from a square to a greek cross, in actuality this is somewhat of a misnomer, as the process to create this effect is actually the reverse – essentially the tessellating motif is decomposed back to its underlying polygon. For the sake of convenience for later usage, these are numbered in reverse order. However, the interpretation is certainly intended to consist of a ‘start to finish' nature. This is accomplished by decreasing the angularity of the outline in a series of stages until the underlying polygon (in this instance a square) solely remains. Here squared paper is a practical necessity, and must be used – although plain paper could be so used, in both accuracy and convenience it is lacking for this purpose. As regards the angularity of the Greek cross, this must be reduced, form which the ‘pinnacle' can be brought nearer the square in a consistent manner, in increments, and then redrawn, continuing the process with subsequent stages. For this, the tempo will be found to depend upon the unit size of the squared paper used. For instance, 1mm paper (below), will result in a cycle of five tiles. As the process is shown fully formed at a somewhat small scale, the diagram immediately below this shows an arbitrary side (the left hand side) in detail, whereby the graph paper lines are more readily visible.
|
Step 3 - Assembling the Individual Tiles Essentially, each of the tiles is now incorporated as a deform, from which this is easily accomplished. Upon numbering the tiles, using the 1mm example, it will be seen that there are five stages from a fully formed Greek cross tile to its underlying square. From this, one can either proceed from either of the two ways, these being a minor variation of the basic method. Here I begin with the previously determined underlying square 1. Beginning with square 1, next to this place tile 2. As can be seen, there are two ways of doing this, of which the example at left 'overlaps' the squares left hand side, whilst the right permits the 'retention' of the square. This process is then continued throughout, with 3 added to 2, 4 added to 3, 5 added to 4, with the right having an additional element, 6 added to five, on account of its longer cycle. |
|
|
|
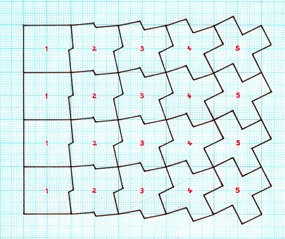
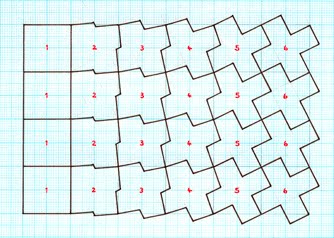
Step 4 - Repeating the Deform as a Linear Composition Upon having established the two types of deforms as a single linear strip, all that now remains to do is show these more fully, to establish that these do indeed tessellate, rather than an possible impression of an arbitrary, non-tessellating strip. As such, the number of tiles to show this is an arbitrary decision, of which in practise a relatively small number is ideal, a typical example being of the 'four unit thickness' as above. |
| |
|
|
| Tempo Of some importance is the tempo of the development, and more specifically this refers to how ‘quick' or ‘slow' in relative terms as to how it proceeds in its course. Quite simply, there is an arbitrarily ideal, essentially between ‘too quick' and ‘too slow' whereby the development can be said to be of the optimum duration, neither taking an absurdly short time or an apparent eternity to complete. As a general principle, those above, of 5 and 6 units respectively can be described as optimum. Examples of the ‘right balance' are to be seen throughout Escher's prints, of which the above-mentioned are exemplary of the art. However, on occasions Escher did indeed use the ‘quick' type (in conjunction with counterchange), notably with a commissioned work of a new year's greeting card for L. and K. Asselbergs, which then apparently spurred on further examples of the type in quick succession. As such, the judgement of these as to their aesthetics is somewhat arbitrary, and so can thus be said to be of a personal choice. Indeed, the quick examples are refreshing in their own right, having an immediacy that is lacking in the more grandiose examples, and despite having a personal preference for the latter type; these are, in their own way, of equal merit. |